New Intel T7600 in the T60 Thinkpad
Finally, a new CPU in the Thinkpad T60
If you’ll recall about a month or two ago, I tried upgrading the CPU in the T60 Thinkpad. It had a 32-bit Intel T2400 in it. Not a bad CPU for its day, but that level of technology is dirt cheap these days, and the supply is rather plentiful, so why not upgrade? I think the Intel T7600 that I upgraded to cost me about $30 or so? It was pretty cheap, in other words. Anyway, that upgrade did not work. It turned out that my bios version was pretty old. Upgrading to a version from 2011 made all the difference, and this time when I powered up, everything behaved as expected. No more blank screen of unknowing from the T60.
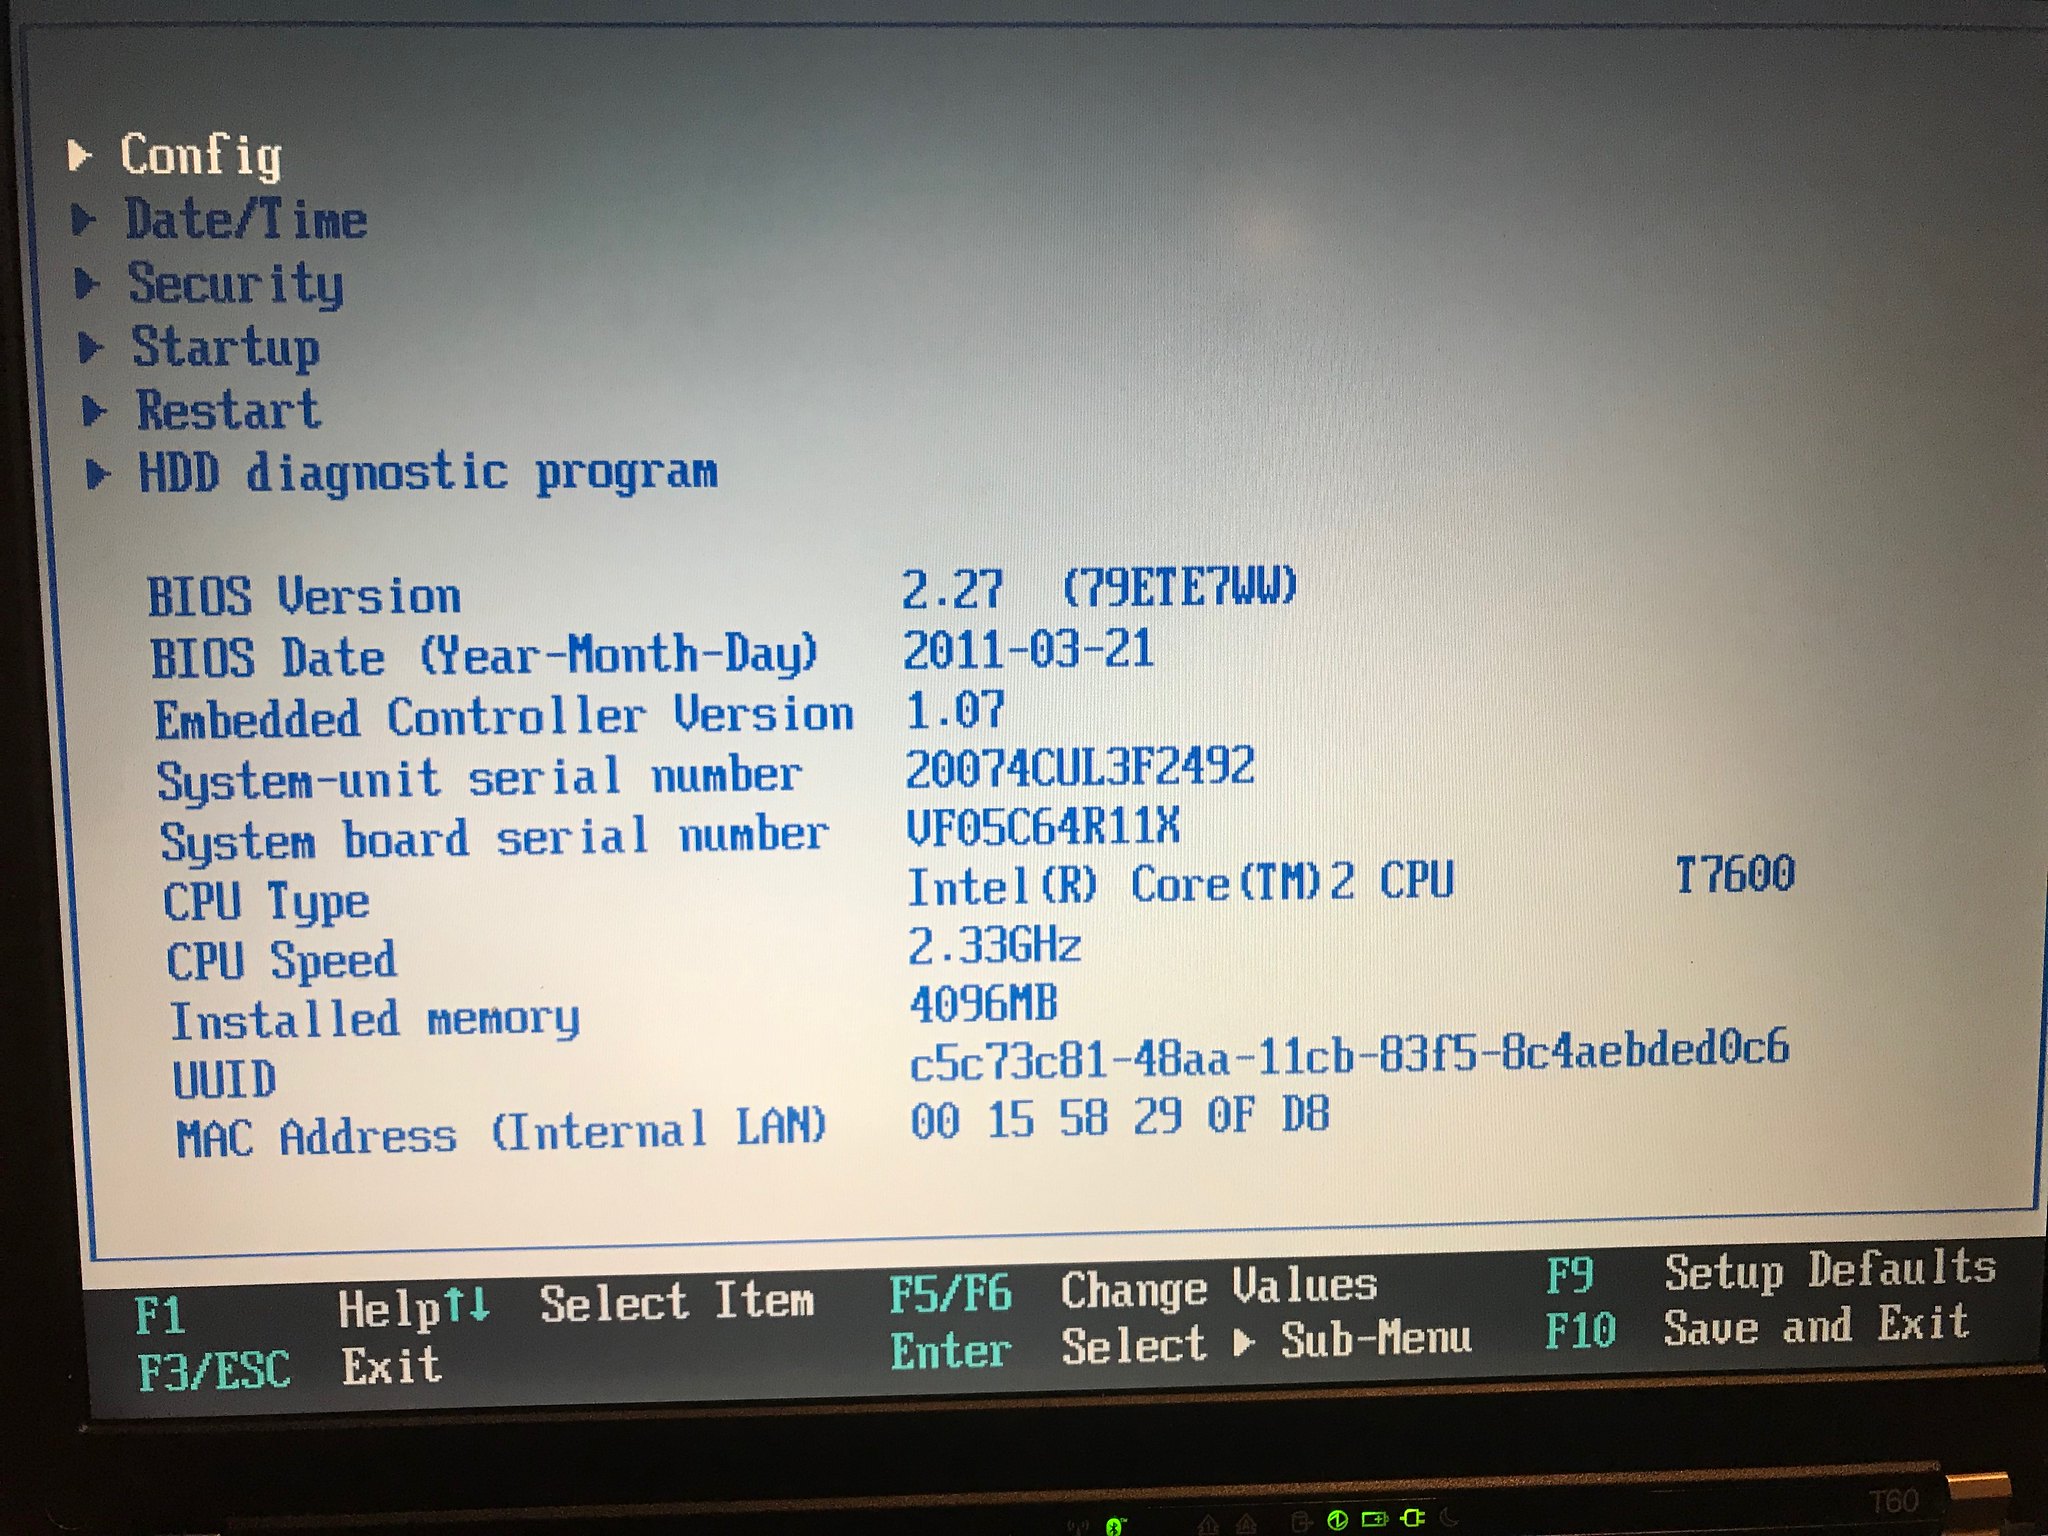
As you can see above, the new CPU is a memrom 64-bit T7600. That’s the max CPU that this old T60 can handle. And, being a 64-bit CPU, it can see all of the RAM installed in the DIMM slots. Prior to this CPU, only 3 Gigs of RAM registered in the bios. So this is an added bonus.
Currently, the OS is Linux LXLE, and it’s a legacy 32-bit version. So it will only see 3 Gigs of RAM. If I upgrade to a 64-bit version, then all 4 Gigs will be available. Yay. But this is enough work for today.
Upgrading the BIOS
It turns out this was the hardest part. So, in case you didn’t know, the BIOS is basically your motherboard. It’s the part of the firmware flashed into the ROM chips on your motherboard that lets your CPU talk to the operating system, and lets the operating system talk to the display and memory and disks and so on. In other words, it’s a critical piece of hardware/software (firmware) that your PC must have to function. If something is wrong with the BIOS, your system will probably not even turn on or power up properly.
The BIOS stands in between the bare metal and the operating system. It’s extremely important. If something goes wrong during the process of flashing a new BIOS onto those chips, you’ve basically bricked your laptop or desktop motherboard. You probably wouldn’t be able to recover from the event. You’d probably have to buy a new logic board (laptop) or motherboard (desktop). So, there is some risk involved anytime you update your BIOS.
Since I run Linux, I was a little unsure about how Lenovo wanted me to update my BIOS. They don’t make a tool for Linux. They support Windows in various versions. Not Linux. There are work arounds, but work arounds can be risky. I don’t want to take risks with this motherboard. I like this motherboard. I don’t see any need to risk bricking this laptop.
The solution I came up with was to buy another el cheapo spinning drive, install Windows 7 on it (a 32-bit version), and use the Lenovo tool for Windows 7 to upgrad the T60 BIOS. Long story short, it worked.
I say long story because it took forever to apply the Windows 7 updates to the SP1 version of Windows 7 I was using. I had to hunt to find a 32-bit version of Windows 7. I bought a couple of bogus licenses on Kinguin for $20, neither one of which would install. Then I bought another version from an American marketplace for $14 I think, and it worked. I entered that license key, and it worked. I had an old 64-bit version key from a disk I bought from Micro Center some years back, but that key wouldn’t work on this version because of the architecture difference.
It took the better part of an hour to install the OS with an 802.11n wifi card and a spinning hard drive. And 3 Gigs of RAM available. Maybe a little longer. After the required reboots, there were something like 1200 or more updates that needed to be applied.
Updating the OS Prior to Updating the BIOS
Before you can update the BIOS, you have to apply all the necessary OS updates. As I mentioned, there were well over 1200 of them. On such legacy hardware, these updates took a surprisingly long time. It took about 9 hours before the OS was updated, and once that was done, the BIOS was updated (reflashed) in about 15-20 minutes or so. Not bad at all. And, thank God, I didn’t brick my laptop. The Windows 7 tool from Lenovo worked like a charm.
I don’t know if it would have worked as cleanly if I had not updated the OS. But, like I said, I didn’t care to risk it. Rather than risk damaging my laptop during the BIOS upgrade, I followed Lenovo instructions to the letter.
The Hardware Change Out
I’m getting pretty good at tearing down this old T60. When I first bought it, it was pretty much a pile of junk. Someone had spilled maple syrup or something on the keyboard. The palm rest was cracked and part of the screw header (one of them) was gone. There was no hard drive or hard drive caddy or hard drive cover. There was minimal memory in the DIMM slots. There was no power adapter or battery. And it had a rather humble CPU. So I’ve upgraded quite a lot, including everything I mentioned now. Fortunately the display is in pretty good shape. There are no dead spots in it. There’s one tiny scratch about the size of a flea. I can’t even see it unless I’m looking at a snow drift on the display. Otherwise, the display, keyboard and palm rest are all great. The keyboard is new, it’s a replacement. It even says IBM on it instead of Lenovo. This was probably one of the very last laptops made by IBM. It doesn’t say Lenovo anywhere on it, on the outside. It says IBM. The actual model type is 2007-4CU. It’s a piece of laptop history!
The thermal paste was still sticky from the last time I tried to replace the CPU. Things cleaned up pretty easily. The old CPU didn’t have too much thermal paste on it either. I’ve done this so many times I pretty much remembered each and every screw by heart. I wish all laptops were as easy to take apart as this one.
There is one little hiccup when reconnecting the palm rest bezel, the keyboard and the palm rest. If the bezel is not correctly seated, the keyboard will not seat properly. If the keyboard doesn’t seat properly, the palm rest won’t seat properly. And if that doesn’t seat properly, the screws won’t fit into their holes when you screw everything back together. That’s a pain in the butt. However, after a little observation and analysis, I found where the bezel had not been clipped back into place. It just needed one or two little presses, and then the audible snaps followed, and the bezel was properly attached to the frame body. Once that happened, the keyboard could slide all the way forward and be out of the way when the palm rest gets installed. Once that is installed correctly, all the screw holes on the back of the laptop will line up with their threaded sockets inside the laptop, and the laptop goes right back together.
It took me about 15 minutes of scratching my head before I came to understand this.
A Fun Little Laptop
So that pretty much completes this T60 project. I don’t think this laptop can be upgraded anymore. The good news is that this laptop does a LOT for how old it is. It’s really a piece of Vintage Computing. It’s like driving a classic car. It works. And really, it works for almost all my basic needs.
In time, I’ll probably even install a 64 bit operating system on here.